Click to Download
Crochet is an art. Arts and hobbies are about passion, magic shared moments, friends, feelings... they are about life... When I decided to start this Blog it was just about that...Making new friends and specially keeping and sharing with my all-of-my-life-Friends. I became a knitting adict.I just can´t help myself getting into any YARN shop I find and buy nice, different, new yarns and textures. I enjoy combining yarns in warm round sweaters. It is all about letting yourself dream.
Showing posts with label Crochet Chalina. Show all posts
Wednesday, June 29, 2011
Sunday, June 26, 2011
scarf- bUFANDA: todays internet discovery
- chain stitch
- slip stitch
Row 1 – base row
chain 7
slip stitch into 7th chain from hook to form a loop.
*chain 11 (4+7) slip stitch into 7th chain from hook* – second loop formed
Repeat from * to * until your base row has desired length (I made 95 loops to get a length of about 2 meters)
turn work
Row 2
chain 10 (3+7)
slip stitch into 7th chain from hook to form next loop
chain 2
slip stitch into top of last loop of previous row *chain 9 (2+7) slip stitch into 7th chain from hook- chain 2 - slip stitch into top of next free loop of previous row* -
repeat from * to * until you reach the end of the row
turn work
Repeat row 2 until scarf has desired width or you almost run out of yarn – remember there is a last row! (I made 13 repeats)
Last Row
since the top of our row is made of loops, we need a finishing row.
For this, after turning the work chain 4 - Slip stitch into top of last loop of previous row *chain 4 - slip stitch into top of next free loop of previous row*- repeat from * to * to the end of the row.
Fasten off, weave in ends.
Enjoy!
Afghan Scarf
Basic Hexagon
With color of choice, ch4, join with sl st to form ring.

Rnd 1: Ch 3 (counts as 1st dc), dc in ring, ch 1, *2 dc in ring, ch 1; rep from * 4 times more, sl st in top of beg ch-3 to join. End off color.
Rnd 2: Attach color of choice in any ch-1 sp. Ch 3 (counts as 1st dc), dc in same sp, ch 2, 2 dc in same sp, ch 1, *2 dc in next ch-1 sp, ch 2, 2 dc in same sp, ch 1; rep from * 4 times more, sl st in top of beg ch-3 to join. End off color.
Rnd 3 (first motif only): Attach color of choice in any ch-1 sp. Ch 1, 1 sc in same sp, *sc in next 2 dc, 3 sc in next ch-2 sp, sc in next 2 dc, sc in next ch-1 sp; rep from * around, ending last rep sc in next 2 dc, 3 sc in next ch-2 sp, sc in next 2 dc. Sl st in beg sc to join. End off color. Weave in all ends.
Rnd 3 (joining round for all subsequent motifs): Attach color of choice in any ch-1 sp. Ch 1, sc in same sp, *sc in next 2 dc, 2 sc in next ch-2 sp, sl st in 2nd of 3- sc corner group of first motif, one more sc in same ch-2 sp of current motif, sc in next 2 dc, sc in next ch-1 sp, sl st in corresponding sc of first motif; rep from * for as many sides as need to be joined, then refer to rnd 3 of the first motif to complete round for the un-joined sides. End off, weave in ends.
by Tracy St. John
With color of choice, ch4, join with sl st to form ring.
Rnd 1: Ch 3 (counts as 1st dc), dc in ring, ch 1, *2 dc in ring, ch 1; rep from * 4 times more, sl st in top of beg ch-3 to join. End off color.
Rnd 2: Attach color of choice in any ch-1 sp. Ch 3 (counts as 1st dc), dc in same sp, ch 2, 2 dc in same sp, ch 1, *2 dc in next ch-1 sp, ch 2, 2 dc in same sp, ch 1; rep from * 4 times more, sl st in top of beg ch-3 to join. End off color.
Rnd 3 (first motif only): Attach color of choice in any ch-1 sp. Ch 1, 1 sc in same sp, *sc in next 2 dc, 3 sc in next ch-2 sp, sc in next 2 dc, sc in next ch-1 sp; rep from * around, ending last rep sc in next 2 dc, 3 sc in next ch-2 sp, sc in next 2 dc. Sl st in beg sc to join. End off color. Weave in all ends.
Rnd 3 (joining round for all subsequent motifs): Attach color of choice in any ch-1 sp. Ch 1, sc in same sp, *sc in next 2 dc, 2 sc in next ch-2 sp, sl st in 2nd of 3- sc corner group of first motif, one more sc in same ch-2 sp of current motif, sc in next 2 dc, sc in next ch-1 sp, sl st in corresponding sc of first motif; rep from * for as many sides as need to be joined, then refer to rnd 3 of the first motif to complete round for the un-joined sides. End off, weave in ends.
by Tracy St. John
Tuesday, May 10, 2011
Saturday, January 1, 2011
Hexagon- Chapter 1- Todays Internet discovery
Hexagon How-to
You need to concentrate to do them!

16 different colours.
4mm hook, and the size of the finished hexagon as you can see above is roughly hand-sized. Each straight side measures 6cm, and about 11cm across between the points.
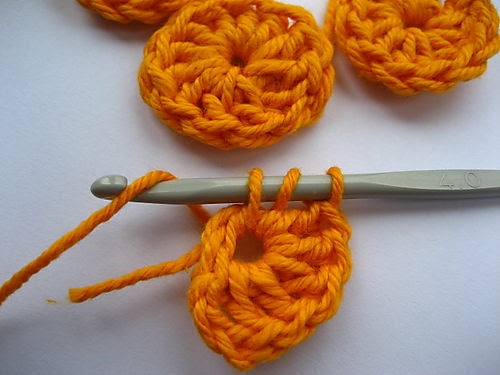
First off chain 4 and join to form a ring. The hole in the centre of the ring will be smallish, but this is where you need to work from for the first round. Tweak it a bit with your fingers to open it out a little.
Chain 3, then work 11 double crochet stitches (US) or treble crochet stitches (UK) into the ring. Join with a slip stitch to the 3rd stitch of the initial chain 3 and fasten off.
You should now have a little whirly wheel circle with 12 stitches/spokes altogether.
Join in a new colour for round 2 :: knot the two yarns together, remember like I showed you for the Granny Squares? Remember you can crochet the ends in as you go with the hex's too, to save you darning ends in at the end.
Pull the new colour yarn through to the front, through one of the dc/tr stitches :: you are working out of the stitches in this round, not the spaces in between the spokes.
For this round, you're going to be making what I think is known as a Bobble Stitch. It's basically where you work two incomplete dc/tr's into the same stitch, joining them at the end by pulling the yarn through all loops.
I shall describe it to you :: yarn over, insert hook through next stitch, yarn over, hook back through stitch (3 loops on hook), yarn over and pull through 2 loops (2 loops on hook). Then yarn over and insert hook through SAME STITCH, yarn over, hook back through stitch (4 loops on hook), yarn over and pull through 2 loops (3 loops on hook), yarn over and pull through all 3 loops.
So this is the pattern for round 2::
Chain 2, then 1 US dc/UK tr in same stitch. Chain 1.
Work a bobble stitch into next stitch as described above, then chain 1 to space.
Repeat 10 more times until you get back to the beginning and have 12 "bobbles" in total. Join round with a slip stitch into the 2nd stitch of the initial chain 2.
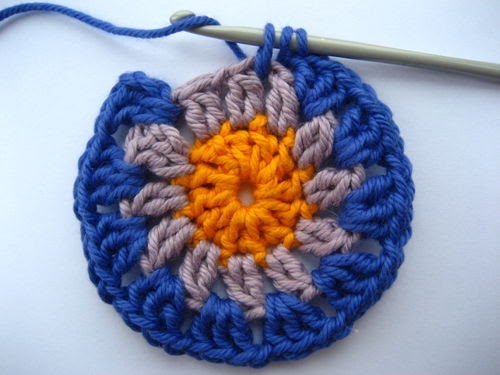
round 3 :: Nice and easy now, you're doing dc/tr clusters just like you do for granny squares. You are working out of the SPACES now, the spaces between the bobble stitch clusters of your previous row.
Join a new colour, pull loop through a space between 2 bobble clusters to start.
Chain 3 (counts as 1 dc/tr), work US dc/UK tr twice into same space, then chain 1.
Work US dc/UK tr three times into next space, chain 1.
Repeat 10 more times until you get back to the beginning and have 12 "clusters" in total. Join round with a slip stitch into the 3rd stitch of the initial chain 3 and fasten off.
Round 4 :: the chain-loop round ::
Join in a new colour and pull loop through a space between the dc/tr clusters of the previous row.
Chain 3, then make a slip stitch into the next space between your dc/tr clusters :: this anchors the chain loop.
Continue making little chain-3's, slip stitching them in place in the gap between the dc/tr clusters of the previous round. Join the last chain-3 with slip stitch into the first chain stitch you made. Do not fasten off as you will use the same colour for round 5.
Round 5 is the final round that forms the hexagon shape. I'm going to tell you how to crochet this as a single hexagon before we talk about the joining-as-you-go method.
We are using the same colour as the last round, and you will be working the stitches under the chain-3 loops you created. So to begin, make a slip stitch under the nearest chain-3 loop.
Chain 3 (counts as one dc/tr), then US dc / UK tr twice. Chain 2 (this is the corner spacing), then in the SAME chain-3 loop, US dc / UK tr three times. This is your first corner, it should look like a double cluster of 6 dc/tr's with a pointy corner bit in the middle.
Into the next chain-3 loop, work US dc / UK tr three times. This is a single cluster and makes a straight side.
Into the next chain-3 loop, work US dc / UK Tr three times, chain 2, then US dc / UK Tr three times. This is your second corner.
Continue working your way round making your clusters of 3 dc's /tr's, alternating between making a double cluster corner group (with chain 2 spacing) and a straight side single cluster. You should be ending the round on a straight-side group of three dc's/Tr's. Join the round with a slip stitch and fasten off.
See?????? It's not so hard?????? You've made your first hexagon!!!
Now if you're happy to make lots of single hexagons and join them all by stitching, then that's absolutely fine. But joining them as you go is fairly easy, although a little fiddly.
You will be working anti-clockwise, starting with a corner, as shown above.
To begin, you make a single cluster as before (chain 3, then dc/tr twice). Then instead of chaining 2 to make your corner spacing, chain ONE, then replace your second chain space with a slip stitch into the corner space of the ajoining hexagon.
Then working into the SAME chain-3 loop, dc/tr three times to finish your corner cluster.
Now you need to slip stitch into the next space of the ajoining hexagon to secure (see above). Basically, you have to insert hook into the space, hook the yarn from the back and pull it through to the front :: first through the space, then through the loop on the hook. It takes a bit of practice, it can be fiddly. But persevere.
You continue to work your way round, forming the hex shape in the same way as described above, but making sure that after each cluster you slip stitch into the relevant space on the ajoining hexagon which makes the attachment. When you get to a corner where you would normally chain 2, you make 2 slip stitches instead (in picture above, one slip stitch is made into the corner of the bright blue hex, and the next slip stitch into the corner of the sage green hex). This is quite hard to explain in words :: please do look over Alex's tutorial, she has some great photos to illustrate. But keep in mind that her pattern is different to mine, she uses more stitches so try not to get confused.
Thanks to: the crator of this pattern!!!!
You need to concentrate to do them!

16 different colours.
4mm hook, and the size of the finished hexagon as you can see above is roughly hand-sized. Each straight side measures 6cm, and about 11cm across between the points.
First off chain 4 and join to form a ring. The hole in the centre of the ring will be smallish, but this is where you need to work from for the first round. Tweak it a bit with your fingers to open it out a little.
Chain 3, then work 11 double crochet stitches (US) or treble crochet stitches (UK) into the ring. Join with a slip stitch to the 3rd stitch of the initial chain 3 and fasten off.
You should now have a little whirly wheel circle with 12 stitches/spokes altogether.
Join in a new colour for round 2 :: knot the two yarns together, remember like I showed you for the Granny Squares? Remember you can crochet the ends in as you go with the hex's too, to save you darning ends in at the end.
Pull the new colour yarn through to the front, through one of the dc/tr stitches :: you are working out of the stitches in this round, not the spaces in between the spokes.
For this round, you're going to be making what I think is known as a Bobble Stitch. It's basically where you work two incomplete dc/tr's into the same stitch, joining them at the end by pulling the yarn through all loops.
I shall describe it to you :: yarn over, insert hook through next stitch, yarn over, hook back through stitch (3 loops on hook), yarn over and pull through 2 loops (2 loops on hook). Then yarn over and insert hook through SAME STITCH, yarn over, hook back through stitch (4 loops on hook), yarn over and pull through 2 loops (3 loops on hook), yarn over and pull through all 3 loops.
So this is the pattern for round 2::
Chain 2, then 1 US dc/UK tr in same stitch. Chain 1.
Work a bobble stitch into next stitch as described above, then chain 1 to space.
Repeat 10 more times until you get back to the beginning and have 12 "bobbles" in total. Join round with a slip stitch into the 2nd stitch of the initial chain 2.
round 3 :: Nice and easy now, you're doing dc/tr clusters just like you do for granny squares. You are working out of the SPACES now, the spaces between the bobble stitch clusters of your previous row.
Join a new colour, pull loop through a space between 2 bobble clusters to start.
Chain 3 (counts as 1 dc/tr), work US dc/UK tr twice into same space, then chain 1.
Work US dc/UK tr three times into next space, chain 1.
Repeat 10 more times until you get back to the beginning and have 12 "clusters" in total. Join round with a slip stitch into the 3rd stitch of the initial chain 3 and fasten off.
Round 4 :: the chain-loop round ::
Join in a new colour and pull loop through a space between the dc/tr clusters of the previous row.
Chain 3, then make a slip stitch into the next space between your dc/tr clusters :: this anchors the chain loop.
Continue making little chain-3's, slip stitching them in place in the gap between the dc/tr clusters of the previous round. Join the last chain-3 with slip stitch into the first chain stitch you made. Do not fasten off as you will use the same colour for round 5.
Round 5 is the final round that forms the hexagon shape. I'm going to tell you how to crochet this as a single hexagon before we talk about the joining-as-you-go method.
We are using the same colour as the last round, and you will be working the stitches under the chain-3 loops you created. So to begin, make a slip stitch under the nearest chain-3 loop.
Chain 3 (counts as one dc/tr), then US dc / UK tr twice. Chain 2 (this is the corner spacing), then in the SAME chain-3 loop, US dc / UK tr three times. This is your first corner, it should look like a double cluster of 6 dc/tr's with a pointy corner bit in the middle.
Into the next chain-3 loop, work US dc / UK tr three times. This is a single cluster and makes a straight side.
Into the next chain-3 loop, work US dc / UK Tr three times, chain 2, then US dc / UK Tr three times. This is your second corner.
Continue working your way round making your clusters of 3 dc's /tr's, alternating between making a double cluster corner group (with chain 2 spacing) and a straight side single cluster. You should be ending the round on a straight-side group of three dc's/Tr's. Join the round with a slip stitch and fasten off.
See?????? It's not so hard?????? You've made your first hexagon!!!
Now if you're happy to make lots of single hexagons and join them all by stitching, then that's absolutely fine. But joining them as you go is fairly easy, although a little fiddly.
You will be working anti-clockwise, starting with a corner, as shown above.
To begin, you make a single cluster as before (chain 3, then dc/tr twice). Then instead of chaining 2 to make your corner spacing, chain ONE, then replace your second chain space with a slip stitch into the corner space of the ajoining hexagon.
Then working into the SAME chain-3 loop, dc/tr three times to finish your corner cluster.
Now you need to slip stitch into the next space of the ajoining hexagon to secure (see above). Basically, you have to insert hook into the space, hook the yarn from the back and pull it through to the front :: first through the space, then through the loop on the hook. It takes a bit of practice, it can be fiddly. But persevere.
You continue to work your way round, forming the hex shape in the same way as described above, but making sure that after each cluster you slip stitch into the relevant space on the ajoining hexagon which makes the attachment. When you get to a corner where you would normally chain 2, you make 2 slip stitches instead (in picture above, one slip stitch is made into the corner of the bright blue hex, and the next slip stitch into the corner of the sage green hex). This is quite hard to explain in words :: please do look over Alex's tutorial, she has some great photos to illustrate. But keep in mind that her pattern is different to mine, she uses more stitches so try not to get confused.
Thanks to: the crator of this pattern!!!!
Sunday, August 15, 2010
Chalina
Chal en ganchillo
Medidas:
Ancho superior: aprox 120 cm
Largo centro posterior: aprox 175 cm
Materiales:
200 g color mix beige claro
50 g color beige claro
AGUJA DE GANCHILLO tamaño 9 mm – o el tamaño necesario para obtener 1 aplicación = 13 x 13 cm.
DIAGRAMAS:
M.1 muestra cómo tejer una aplicación. M.2 muestra cómo 2 aplicaciones se tejen juntas. M.3 muestra el orden de las aplicaciones.
CHAL:
Se teje en hileras. Para cada hilera tejer una aplicación menos, la primera aplicación en una nueva hilera se teje en la segunda aplicación de la hilera abajo, continuar así hasta tener solamente 1 aplicación restante en la última hilera. El chal se teje desde la esquina de un lado corto a la esquina del otro lado corto – ver M.3.
PRIMERA HILERA – APLICACIÓN 1:
También ver M.1. Mon 4 cad con 1 hilo Eskimo y ag de ganchillo tamaño 9 mm y formar un anillo con 1 p.bjs en la primera cad.
VUELTA 1: * 12 cad, 1 p.b. en el anillo de cad *, repetir de *a* un total de 8 veces = 8 bucles de cad, cortar el hilo.
VUELTA 2: Cambiar a 2 hilos Puddel. Tejer 1 p.b. arriba del primer bucle de cad, * 3 cad, 1 p.b. arriba del bucle de cad siguiente, 5 cad (= esquina), 1 p.b. arriba del bucle de cad siguiente *, repetir de *a* un total de 4 veces, pero la última vez sustituir el último p.b. con 1 p.bjs en el primer p.b. del inicio de la vta. Cortar y asegurar los hilos.
PRIMERA HILERA – APLICACIÓN 2:
Inicio + vuelta 1: Como la aplicación 1.
VUELTA 2: También ver M.2
Cambiar a 2 hilos Puddel. Tejer 1 p.b. arriba del bucle de cad sig, 5 cad (= esquina), 1 p.b. arriba del bucle de cad sig *, repetir de *a* un total de 2 veces, * 3 cad, 1 p.b. arriba del bucle de cad sig, 2 cad, 1 p.b. en la esquina de la aplicación anterior (es decir, en el bucle de 5 cad con Puddel), 2 cad, 1 p.b. arriba del sig bucle de cad Eskimo en la aplicación 2, 1 cad, 1 p.b. en bucle de 3 cad con Puddel de la aplicación anterior, 1 cad, 1 p.b. arriba del sig bucle de cad Eskimo en la aplicación 2, 2 cad, 1 p.b. en la esquina sig de la aplicación anterior, 2 cad, 1 p.bjs en el primer p.b. con Puddel del inicio de la vta en la aplicación 2.
Tejer otras 5 aplicaciones como la aplicación 2 = 7 aplicaciones en la primera vta.
SEGUNDA HILERA – APLICACIÓN 8:
Inicio + vuelta 1: Como la aplicación 1.
VUELTA 2: También ver M.2.
Cambiar a 2 hilos Puddle. Tejer 1 p.b. arriba del primer bucle de cad, * 3 cad, 1 p.b. arriba del bucle de cad sig, 5 cad (= esquina), 1 p.b. arriba del bucle de cad sig *, repetir de *a* un total de 2 veces, * 3 cad, 1 p.b. arriba del bucle de cad sig, 2 cad, 1 p.b. en la esquina entre la aplicación 2 y 3, 2 cad, 1 p.b. arriba del sig bucle de cad Eskimo en la aplicación 8, 1 cad, 1 p.b. en el bucle de 3 cad con Puddel en la aplicación 2, 1 cad, 1 p.b. arriba del sig bucle de cad Eskimo en la aplicación 8, 2 cad, 1 p.b. en la esquina entre la aplicación 1 y 2, 2 cad, 1 p.bjs en el primer p.b. con Puddel del inicio de la vta en la aplicación 8.
SEGUNDA HILERA – APLICACIÓN 9:
Inicio + vuelta 1: Como la aplicación 1.
VUELTA 2: Cambiar a 2 hilos Puddel.
Tejer 1 p.b. arriba del primer bucle de cad, 3 cad, 1 p.b. arriba del bucle de cad sig, 5 cad (= esquina), 1 p.b. arriba del bucle de cad sig, 3 cad, 1 p.b. arriba del bucle de cad sig, 2 cad, 1 p.b. en la esquina entre la aplicación 3 y 4, 2 cad, 1 p.b. arriba del sig bucle de cad Eskimo en la aplicación 9, 1 cad, 1 p.b. en el bucle de 3 cad con Puddel en la aplicación 3, 1 cad, 1 p.b. arriba del sig bucle de cad Eskimo en la aplicación 9, 2 cad, 1 p.b. en la esquina entre la aplicación 2, 3 y 8, 2 cad, 1 p.b. arriba del sig bucle de cad Eskimo en la aplicación 9, 1 cad, 1 p.b. en el bucle de 3 cad con Puddel en la aplicación 8, 1 cad, 1 p.b. arriba del sig bucle de cad Eskimo en la aplicación 8, 2 cad, 1 p.b. en la esquina sig en la aplicación 8, 2 cad, 1 p.bjs en el primer p.b. con Puddel del inicio de la vta en la aplicación 9.
Tejer otras 4 aplicaciones como la aplicación 9 = 6 aplicaciones en la segunda hilera.
Continuar como la segunda vuelta con 1 aplicación menos por hilera hasta tener únicamente 1 aplicación.
ORILLA:
Tejer una orilla a lo largo de ambos laterales cortos con 2 hilos Puddel y ag de ganchillo tamaño 9 mm como sigue:
1 p.b. en el bucle de cad en la esquina superior de un lateral, * 5 cad, 1 p.b. en el bucle de cad sig *, repetir de *a* hacia abajo de un lateral y hacia arriba del otro lateral, cortar el hilo – NOTA: en el bucle de cad en la punta inferior tejer 1 bucle extra, es decir, en este bucle tejer 2 p.b. con 5 cad entre cada uno.
Explicación al diagrama del patrón
- = 1 cad
‹ = 1 p.bjs
T = 1 p.b.
Diagrama
Medidas:
Ancho superior: aprox 120 cm
Largo centro posterior: aprox 175 cm
Materiales:
200 g color mix beige claro
50 g color beige claro
AGUJA DE GANCHILLO tamaño 9 mm – o el tamaño necesario para obtener 1 aplicación = 13 x 13 cm.
DIAGRAMAS:
M.1 muestra cómo tejer una aplicación. M.2 muestra cómo 2 aplicaciones se tejen juntas. M.3 muestra el orden de las aplicaciones.
CHAL:
Se teje en hileras. Para cada hilera tejer una aplicación menos, la primera aplicación en una nueva hilera se teje en la segunda aplicación de la hilera abajo, continuar así hasta tener solamente 1 aplicación restante en la última hilera. El chal se teje desde la esquina de un lado corto a la esquina del otro lado corto – ver M.3.
PRIMERA HILERA – APLICACIÓN 1:
También ver M.1. Mon 4 cad con 1 hilo Eskimo y ag de ganchillo tamaño 9 mm y formar un anillo con 1 p.bjs en la primera cad.
VUELTA 1: * 12 cad, 1 p.b. en el anillo de cad *, repetir de *a* un total de 8 veces = 8 bucles de cad, cortar el hilo.
VUELTA 2: Cambiar a 2 hilos Puddel. Tejer 1 p.b. arriba del primer bucle de cad, * 3 cad, 1 p.b. arriba del bucle de cad siguiente, 5 cad (= esquina), 1 p.b. arriba del bucle de cad siguiente *, repetir de *a* un total de 4 veces, pero la última vez sustituir el último p.b. con 1 p.bjs en el primer p.b. del inicio de la vta. Cortar y asegurar los hilos.
PRIMERA HILERA – APLICACIÓN 2:
Inicio + vuelta 1: Como la aplicación 1.
VUELTA 2: También ver M.2
Cambiar a 2 hilos Puddel. Tejer 1 p.b. arriba del bucle de cad sig, 5 cad (= esquina), 1 p.b. arriba del bucle de cad sig *, repetir de *a* un total de 2 veces, * 3 cad, 1 p.b. arriba del bucle de cad sig, 2 cad, 1 p.b. en la esquina de la aplicación anterior (es decir, en el bucle de 5 cad con Puddel), 2 cad, 1 p.b. arriba del sig bucle de cad Eskimo en la aplicación 2, 1 cad, 1 p.b. en bucle de 3 cad con Puddel de la aplicación anterior, 1 cad, 1 p.b. arriba del sig bucle de cad Eskimo en la aplicación 2, 2 cad, 1 p.b. en la esquina sig de la aplicación anterior, 2 cad, 1 p.bjs en el primer p.b. con Puddel del inicio de la vta en la aplicación 2.
Tejer otras 5 aplicaciones como la aplicación 2 = 7 aplicaciones en la primera vta.
SEGUNDA HILERA – APLICACIÓN 8:
Inicio + vuelta 1: Como la aplicación 1.
VUELTA 2: También ver M.2.
Cambiar a 2 hilos Puddle. Tejer 1 p.b. arriba del primer bucle de cad, * 3 cad, 1 p.b. arriba del bucle de cad sig, 5 cad (= esquina), 1 p.b. arriba del bucle de cad sig *, repetir de *a* un total de 2 veces, * 3 cad, 1 p.b. arriba del bucle de cad sig, 2 cad, 1 p.b. en la esquina entre la aplicación 2 y 3, 2 cad, 1 p.b. arriba del sig bucle de cad Eskimo en la aplicación 8, 1 cad, 1 p.b. en el bucle de 3 cad con Puddel en la aplicación 2, 1 cad, 1 p.b. arriba del sig bucle de cad Eskimo en la aplicación 8, 2 cad, 1 p.b. en la esquina entre la aplicación 1 y 2, 2 cad, 1 p.bjs en el primer p.b. con Puddel del inicio de la vta en la aplicación 8.
SEGUNDA HILERA – APLICACIÓN 9:
Inicio + vuelta 1: Como la aplicación 1.
VUELTA 2: Cambiar a 2 hilos Puddel.
Tejer 1 p.b. arriba del primer bucle de cad, 3 cad, 1 p.b. arriba del bucle de cad sig, 5 cad (= esquina), 1 p.b. arriba del bucle de cad sig, 3 cad, 1 p.b. arriba del bucle de cad sig, 2 cad, 1 p.b. en la esquina entre la aplicación 3 y 4, 2 cad, 1 p.b. arriba del sig bucle de cad Eskimo en la aplicación 9, 1 cad, 1 p.b. en el bucle de 3 cad con Puddel en la aplicación 3, 1 cad, 1 p.b. arriba del sig bucle de cad Eskimo en la aplicación 9, 2 cad, 1 p.b. en la esquina entre la aplicación 2, 3 y 8, 2 cad, 1 p.b. arriba del sig bucle de cad Eskimo en la aplicación 9, 1 cad, 1 p.b. en el bucle de 3 cad con Puddel en la aplicación 8, 1 cad, 1 p.b. arriba del sig bucle de cad Eskimo en la aplicación 8, 2 cad, 1 p.b. en la esquina sig en la aplicación 8, 2 cad, 1 p.bjs en el primer p.b. con Puddel del inicio de la vta en la aplicación 9.
Tejer otras 4 aplicaciones como la aplicación 9 = 6 aplicaciones en la segunda hilera.
Continuar como la segunda vuelta con 1 aplicación menos por hilera hasta tener únicamente 1 aplicación.
ORILLA:
Tejer una orilla a lo largo de ambos laterales cortos con 2 hilos Puddel y ag de ganchillo tamaño 9 mm como sigue:
1 p.b. en el bucle de cad en la esquina superior de un lateral, * 5 cad, 1 p.b. en el bucle de cad sig *, repetir de *a* hacia abajo de un lateral y hacia arriba del otro lateral, cortar el hilo – NOTA: en el bucle de cad en la punta inferior tejer 1 bucle extra, es decir, en este bucle tejer 2 p.b. con 5 cad entre cada uno.
Explicación al diagrama del patrón
- = 1 cad
‹ = 1 p.bjs
T = 1 p.b.
Diagrama
Etiquetas:
Crochet Chalina
Subscribe to:
Posts (Atom)
Translations Crochet (English to Spanish)
CH : Chain/ Cadena o cadeneta
CH SP INCR: (vareta, cadeneta, vareta) en el mismo punto
CHAIN: Cadena
DOUBLE CROCHET: Vareta
HALF DOUBLE CROCHET: Media vareta
HOOK: Aguja de crochet
SINGLE CROCHET: Medio punto
SLIP STITCH: Saltar una cadeneta
TREBBLE CROCHET: Vareta Doble
CH SP INCR: (vareta, cadeneta, vareta) en el mismo punto
CHAIN: Cadena
DOUBLE CROCHET: Vareta
HALF DOUBLE CROCHET: Media vareta
HOOK: Aguja de crochet
SINGLE CROCHET: Medio punto
SLIP STITCH: Saltar una cadeneta
TREBBLE CROCHET: Vareta Doble
Translations Spanish English- Knitting
Término/ Sinónimo/Traducción al inglés
Abrigo /xxx/coat
Aumentar/ XXX/ increase
Borla/ xxx/ tassel
Cadena o cadeneta/ xxx/ chain stitch
Chal / Reboso (México) Mañanita (México)/shawl
Chalina/ Bufanda/ scarf
Chullo/ XXX/ Peruvian hat
Chompa/ sueter o jersey (España)/ sweater
Crochet/ ganchillo- gancho para tejer (México)/ crochet, hook
Disminución simple/ surjete simple / decrease - skp (slip,knit,pass)- (slip1, knit1, pass the slipped, stitch over. The same as SKP)
Horquilla / Horquilleta/ Hairpin lace
Jalar / tensar, estirar o amarrar (España) / throw away
Lana / estambre / wool, yarn
Lazada / hebra/ yarn over (wrap the yarn around right needle)
loop / Medida / gauge
Palos o palitos de tejer/ dos agujas-agujas de tejer / knitting needles
Pastilla tejida/ motivo (cuadrado, hexágono o círculo) (Argentina) /
Poncho / capa (México) poncho
Punto / Stitch
Punto raso (crochet)/ slip stitch
Punto bajo (crochet) / medio pilar (Guatemala)- media vareta/ single crochet
Punto alto (crochet) / pilar, vareta o macizo (México) punto monito (México) / half double crochet
Punto alto doble (crochet) / doble pilar (Guatemala) doble vareta / double crochet
Punto alto triple (crochet) /triple vareta /treble crochet
Punto alto en relieve (crochet)/ front post double crochet
Pompón / Borla (México) Mota o motita (México) / pom pom
Punto inglés (dos agujas)/ Brioche stitch
Punto santa clara / Punto musgo (México) / Garter stitch
Ropón / chambrita (México) chaqueta de bebé suetercito (Guatemala) / baby jacket
Tapado / echarpe, poncho o abrigo abrochado por delante (España)
Tejer / calcetar (España) / knit
Telar / telar maya o azteca (México) / loom
Abrigo /xxx/coat
Aumentar/ XXX/ increase
Borla/ xxx/ tassel
Cadena o cadeneta/ xxx/ chain stitch
Chal / Reboso (México) Mañanita (México)/shawl
Chalina/ Bufanda/ scarf
Chullo/ XXX/ Peruvian hat
Chompa/ sueter o jersey (España)/ sweater
Crochet/ ganchillo- gancho para tejer (México)/ crochet, hook
Disminución simple/ surjete simple / decrease - skp (slip,knit,pass)- (slip1, knit1, pass the slipped, stitch over. The same as SKP)
Horquilla / Horquilleta/ Hairpin lace
Jalar / tensar, estirar o amarrar (España) / throw away
Lana / estambre / wool, yarn
Lazada / hebra/ yarn over (wrap the yarn around right needle)
loop / Medida / gauge
Palos o palitos de tejer/ dos agujas-agujas de tejer / knitting needles
Pastilla tejida/ motivo (cuadrado, hexágono o círculo) (Argentina) /
Poncho / capa (México) poncho
Punto / Stitch
Punto raso (crochet)/ slip stitch
Punto bajo (crochet) / medio pilar (Guatemala)- media vareta/ single crochet
Punto alto (crochet) / pilar, vareta o macizo (México) punto monito (México) / half double crochet
Punto alto doble (crochet) / doble pilar (Guatemala) doble vareta / double crochet
Punto alto triple (crochet) /triple vareta /treble crochet
Punto alto en relieve (crochet)/ front post double crochet
Pompón / Borla (México) Mota o motita (México) / pom pom
Punto inglés (dos agujas)/ Brioche stitch
Punto santa clara / Punto musgo (México) / Garter stitch
Ropón / chambrita (México) chaqueta de bebé suetercito (Guatemala) / baby jacket
Tapado / echarpe, poncho o abrigo abrochado por delante (España)
Tejer / calcetar (España) / knit
Telar / telar maya o azteca (México) / loom
Posts
2 Needles Sweaters
(3)
Accesorio
(9)
African Flower
(2)
Back to school Crochet Patterns
(1)
Begginers
(3)
book cover
(1)
bordes
(1)
Bufandas
(6)
christmas presents
(20)
Cleaning Crochet Knitting
(2)
conversion charts
(1)
Crochet Accessories
(29)
Crochet Bag
(7)
CROCHET Bolero
(3)
Crochet Chalina
(6)
Crochet Flowers
(19)
Crochet guia puntos
(4)
Crochet Kitchen
(7)
Crochet Manta
(4)
Crochet Pattern- Skirt and top
(4)
Crochet Pattern- Tea Cosy
(4)
crochet PONCHO
(3)
crochet Puntos
(5)
crochet slippers
(3)
Crochet Squares
(11)
Crochet Stiches
(7)
crochet Stiches translations
(1)
CROCHET sweaters
(8)
CROCHET Terminaciones
(2)
Crochet Tips
(8)
Crochet toys
(1)
CROCHETSummer
(2)
easy
(1)
Flor Crochet
(16)
FLores
(15)
gift
(1)
Gloves
(1)
Granny Squares
(11)
guantes
(2)
hat
(3)
hexagonos
(4)
Hexagons
(4)
Home Designs
(12)
Intermediate
(2)
invierno
(6)
Kitchen
(5)
Knitting Translations
(2)
magazine
(2)
medias
(1)
Nice web site to visit
(1)
Niños-Kids
(2)
Painting
(4)
Pantuflas crochet
(2)
pencil case
(3)
photo album cover
(1)
Pollera
(3)
Pot holders
(1)
Quick crochet pattern
(12)
Remera
(1)
Revista
(26)
Revista Arte Experto
(2)
Revista Croche
(7)
Revista DIana
(1)
Revista Home designs
(3)
Revista Lana Stop
(1)
Revista Para Ti Guia De Puntos
(1)
Revista Punto Cruz
(1)
Revista tejer la moda
(5)
Revista tejido
(17)
Rose
(4)
SCarf
(5)
shirt
(1)
Socks
(2)
teens
(2)
Tips of the day
(8)
Todays internet discovery
(24)
verano
(1)
winter
(6)